1.5.5 Preview a Practice Test
Follow these steps to preview any Practice Test in EdisonOS as a student would experience it.
What is Preview?
The Preview feature lets you experience a Practice Test exactly as your students will, including the full test interface, timing, and a sample performance report at the end without creating any attempt records or deducting credits.
Note:
By default, EdisonOS will display content from the EdisonOS Library. If you want to preview Practice Tests you have created yourself, make sure to switch to My Library to see your own content.
This walkthrough uses the SAT workflow — the same flow shown in the video for this article.
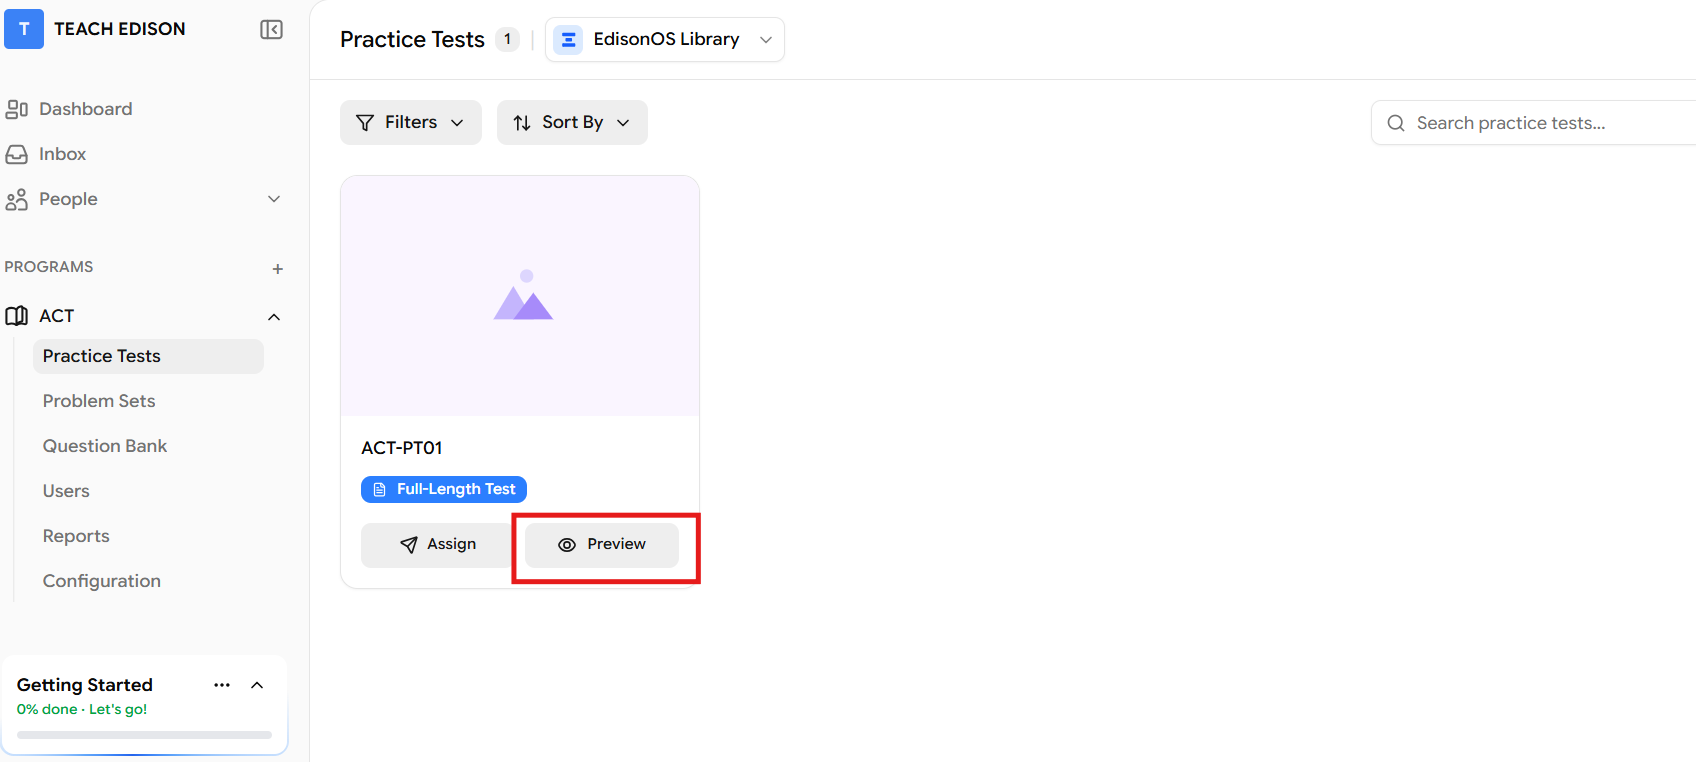
Step 1: Open the Practice Test
From the sidebar, navigate to your Program (e.g., SAT, ACT).
Click on Practice Tests in the left navigation.
Locate the Practice Test you want to preview, then click the Preview button next to it.
Step 2: Review the Preview Confirmation
A screen titled "You're about to preview this Practice Test" will appear. This confirms what preview mode does and does not do:
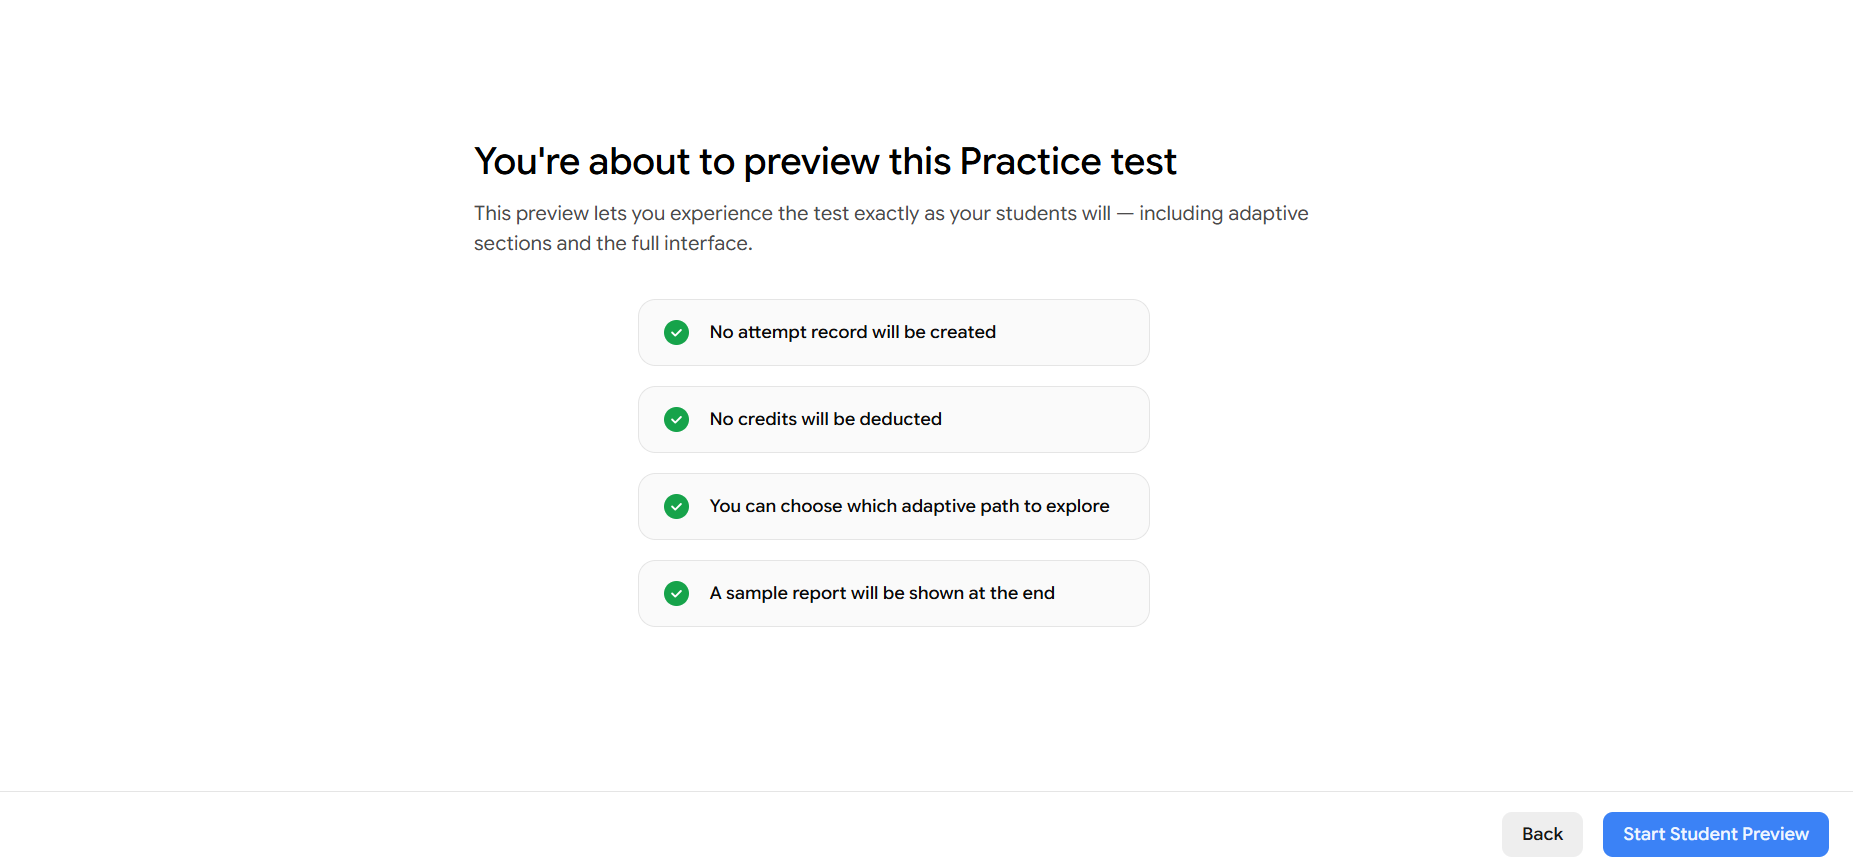
Once you've reviewed these details, click Start Student Preview in the bottom-right corner.
Changed your mind? Click Back to return to the Practice Test page.
Step 3: System & Network Check
After clicking Start Student Preview, EdisonOS runs an automatic system and network check. This is the same check your students go through before beginning any test.
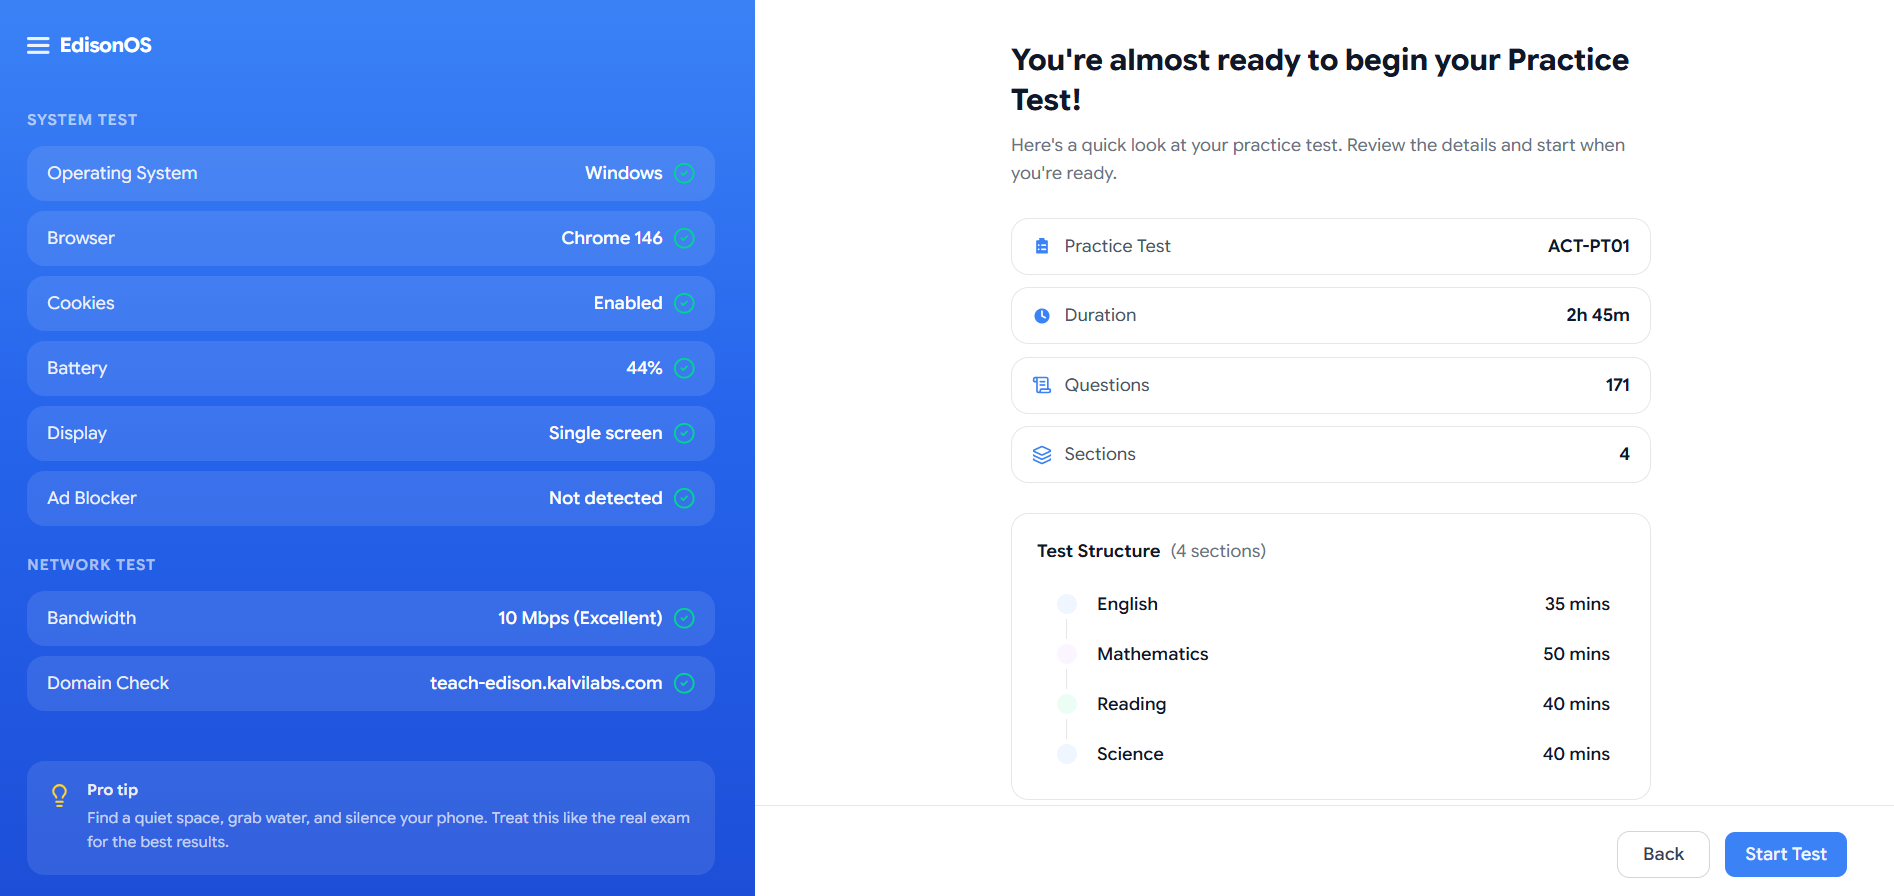
The left panel will display results across two categories:
System Test
Operating System
Browser
Cookies
Battery level
Display (single or multi-screen)
Ad Blocker detection
Network Test
Bandwidth speed and quality rating
Domain connectivity check
All items will show a green checkmark ✅ once they pass.
The right panel shows a summary of the Practice Test you are about to preview:
Detail | What it shows |
|---|---|
Practice Test | Name of the test being previewed |
Duration | Total time allowed (e.g., 60 minutes) |
Questions | Total number of questions in the test |
When you are ready, click Start Preview in the bottom-right corner.
Step 4: Answer the Questions
The full student-facing test interface will now launch. You will experience the Practice Test exactly as a student would.
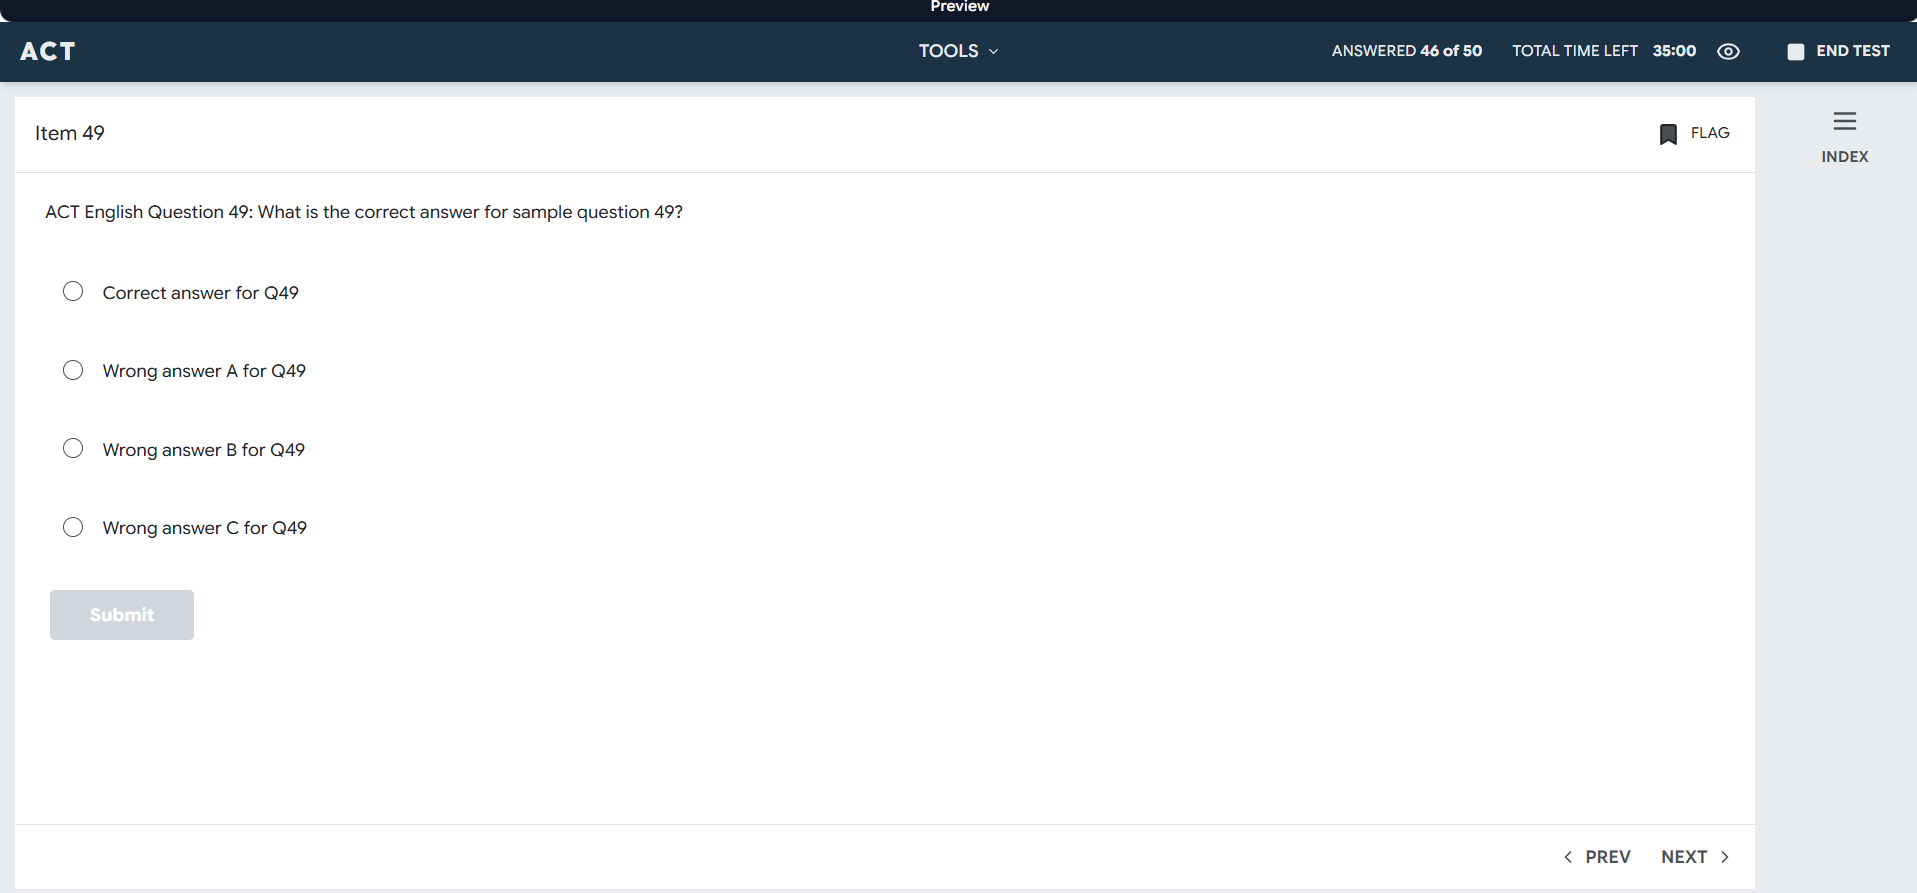
The interface includes:
Top bar: Displays the exam name (e.g., SAT, ACT), a Tools menu, the number of questions answered (e.g., Answered 5 of 5), total time remaining, and an End Test button.
Question area: Each question is presented one at a time with multiple-choice answer options and a Submit button.
Flag: Flag any question for review later.
Index: Open a question index panel to jump between questions.
PREV / NEXT: Navigate between questions using the bottom navigation arrows.
Work through the questions as your students would to get a true sense of the full test experience.
If a Practice Test has multiple modules, you'll see the Practice Test Break screen after completing each one. This is the same break students see between sections on test day, and you'll experience it during the preview too.
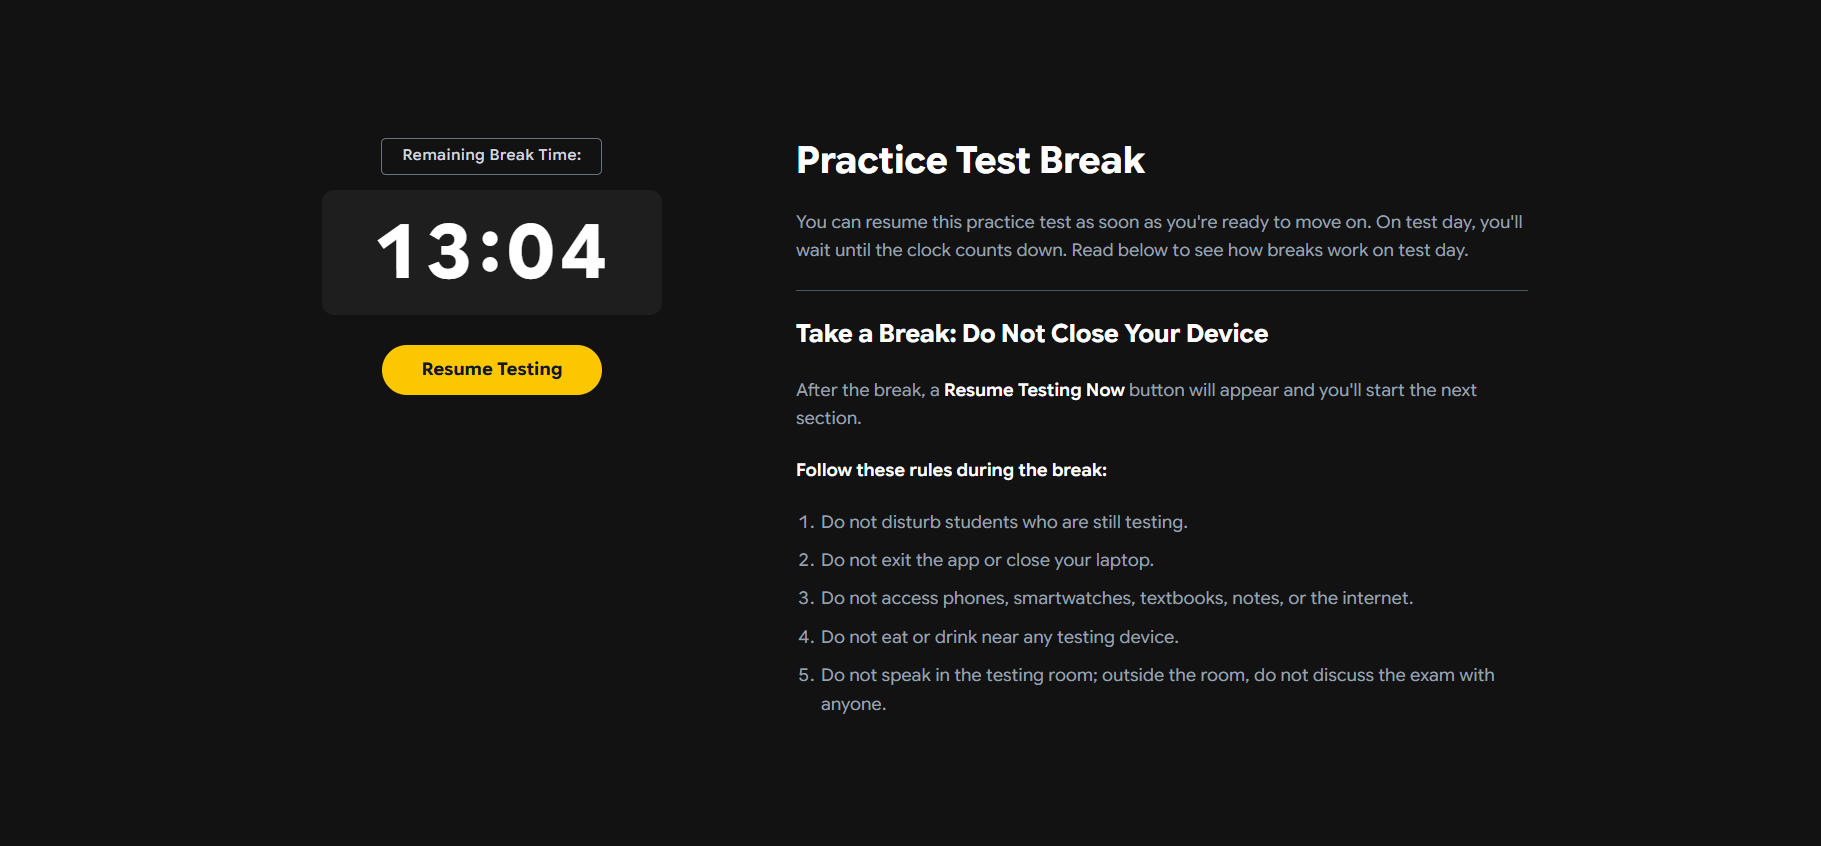
The break screen shows:
A Remaining Break Time countdown timer (e.g., 13:04 from 15:00)
A Resume Testing button to skip the break and move on immediately
Break rules students are expected to follow during test day
During preview, you can click Resume Testing at any time to skip the break countdown and move straight to the next module. You do not need to wait for the timer to run out.
Step 5: End the Test
When you are ready to finish (either after answering all questions or at any point), click End Test in the top-right corner.
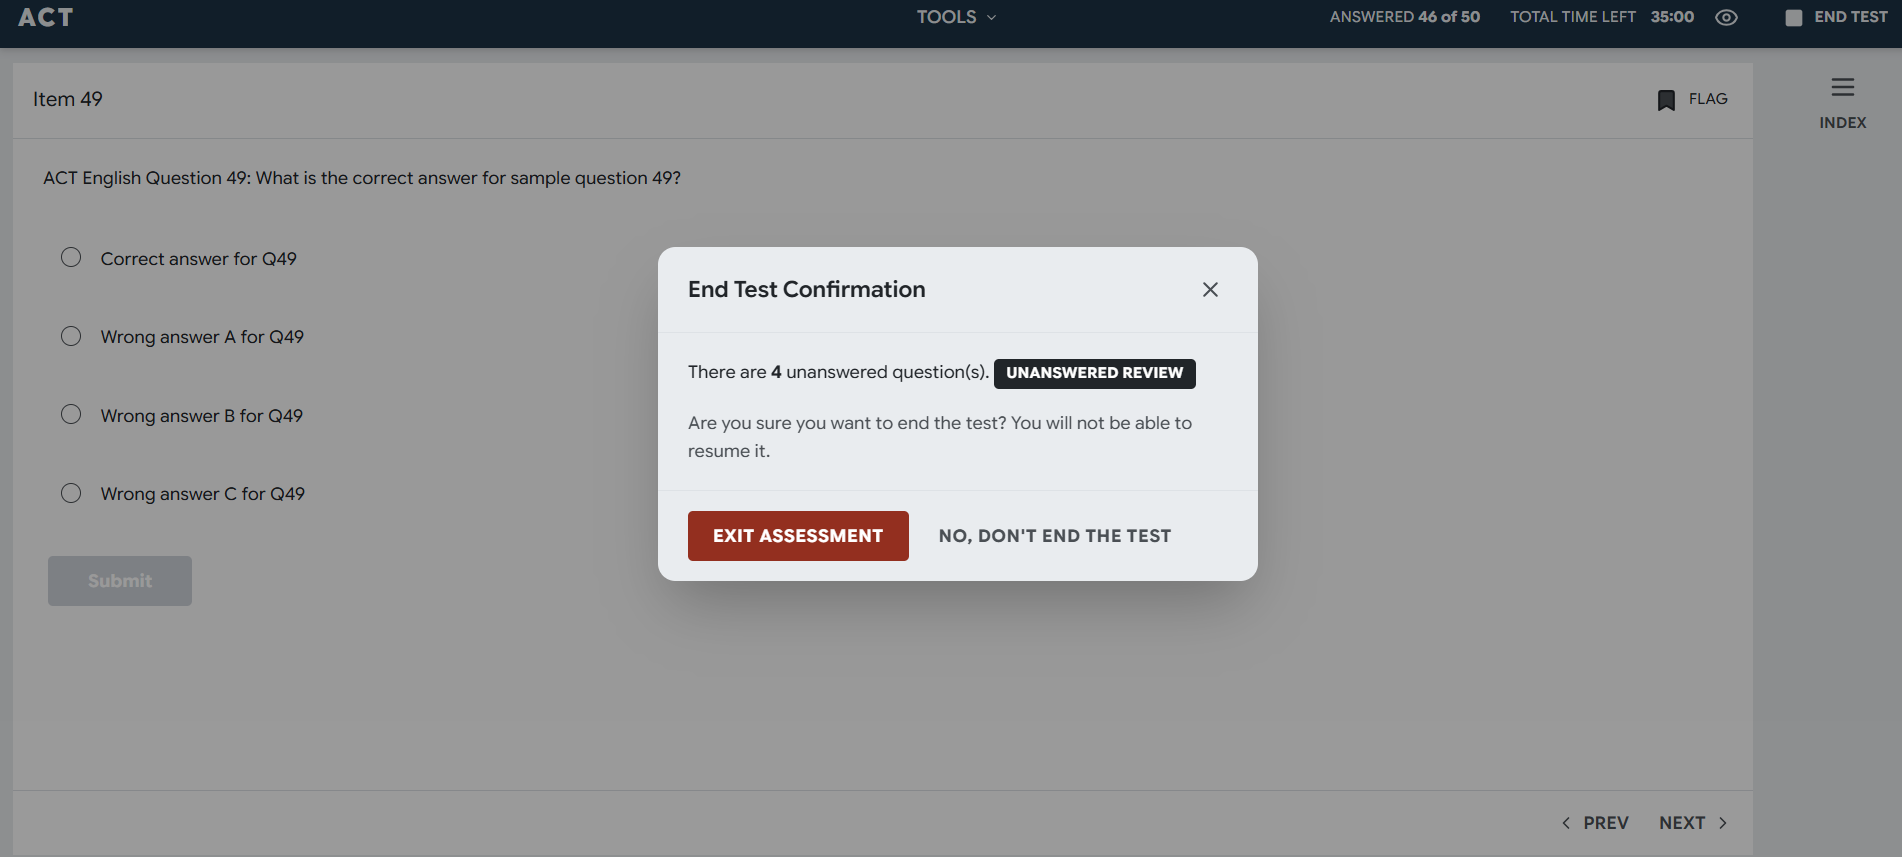
An End Test Confirmation dialog will appear:
It shows the number of unanswered questions remaining (e.g., "There are 0 unanswered question(s)").
You can click Unanswered Review to go back and review any skipped questions before submitting.
Click Exit Assessment to confirm and submit the preview.
Click No, Don't End the Test to return to the test and continue answering.
Once you click Exit Assessment, you will not be able to resume the test.
Step 6: Review the Sample Report
After submitting, EdisonOS will automatically display the Preview Report (Sample), the same report your students receive at the end of a Practice Test. The report is labeled with the test name (e.g., ACT-PT01) alongside a Preview badge, and shows the start and submission timestamps.
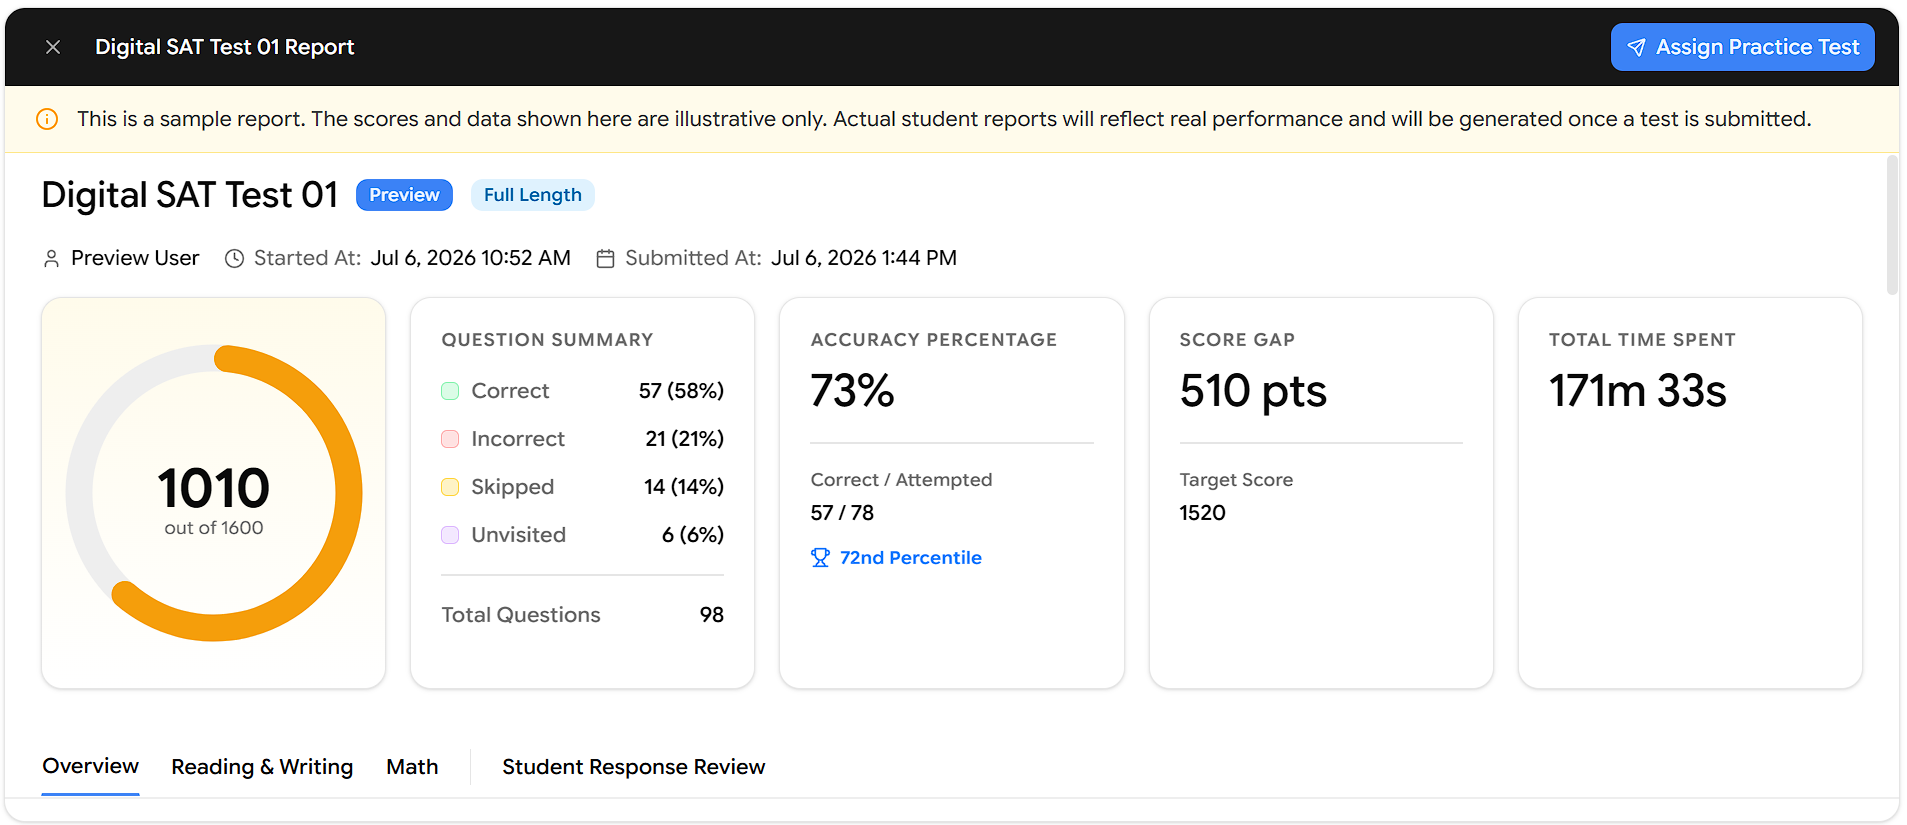
Top-Level Performance Summary
The first thing you see is an at-a-glance scorecard across five metrics:
Metric | What it shows |
|---|---|
Score | Raw score out of total (e.g., 105 out of 171) shown as a circular progress indicator |
Percentile | Where the student ranks relative to others (e.g., 72nd percentile), with Correct Answers overall |
Accuracy | Percentage of correctly answered attempted questions (e.g., 61%), with Correct Answers out of attempted |
Current Gap | Points needed to reach the target score (e.g., 32 pts away from a target of 137) |
Time Spent | Total time taken to complete the full test (e.g., 276m 33s) |
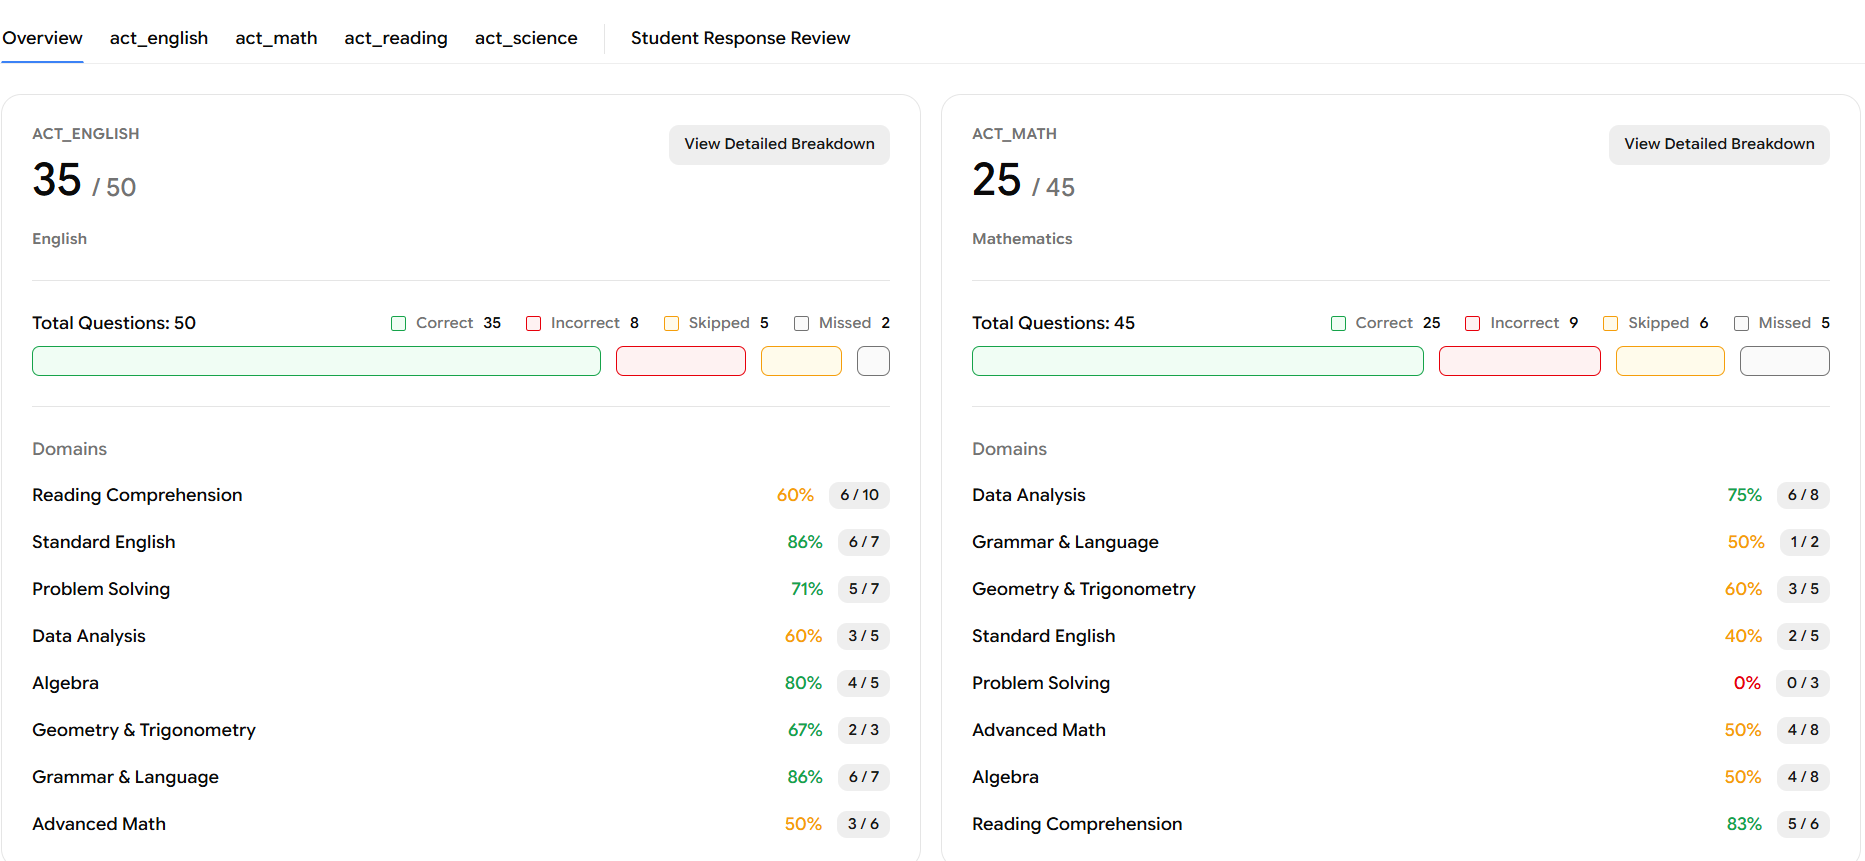
Section-by-Section Breakdown
Below the summary, the report is organized into tabs, one for each section of the exam. For an ACT test, these are:
Overview: Overall summary across all sections
act_english: English section results
act_math: Math section results
act_reading: Reading section results
act_science: Science section results
Student Response Review: full question-by-question review
Click directly on the section tab (e.g., act_english) in the top navigation, or click View Detailed Breakdown on any section card within the Overview tab, both take you to the same detailed view.
Inside a Section's Detailed View
Once inside a section (for example, ACT English), you will see:

Three key metrics at the top:
Metric | What it shows |
|---|---|
Score % | Percentage score with raw correct count out of total questions |
Accuracy | Correct answers out of attempted questions only, excluding skipped |
Time Taken | Total time spent on that section |
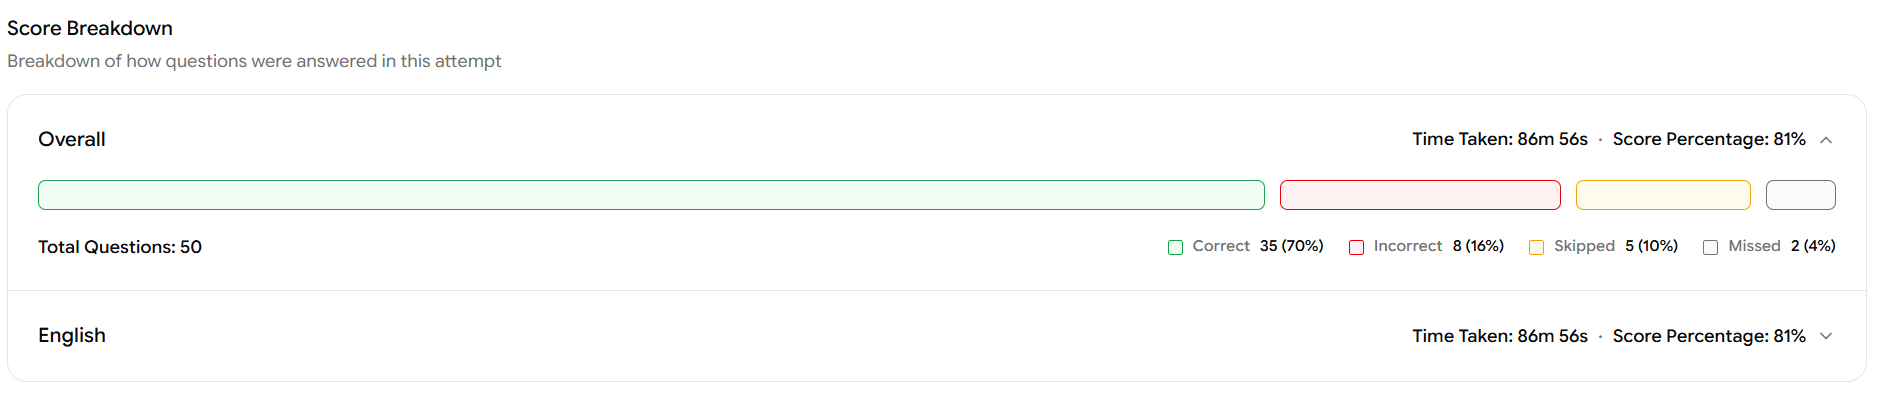
Score Breakdown: It shows an Overall bar with a color-coded split of Correct, Incorrect, Skipped, and Missed with their respective percentages across the section, followed by a breakdown at the subject level within that section.
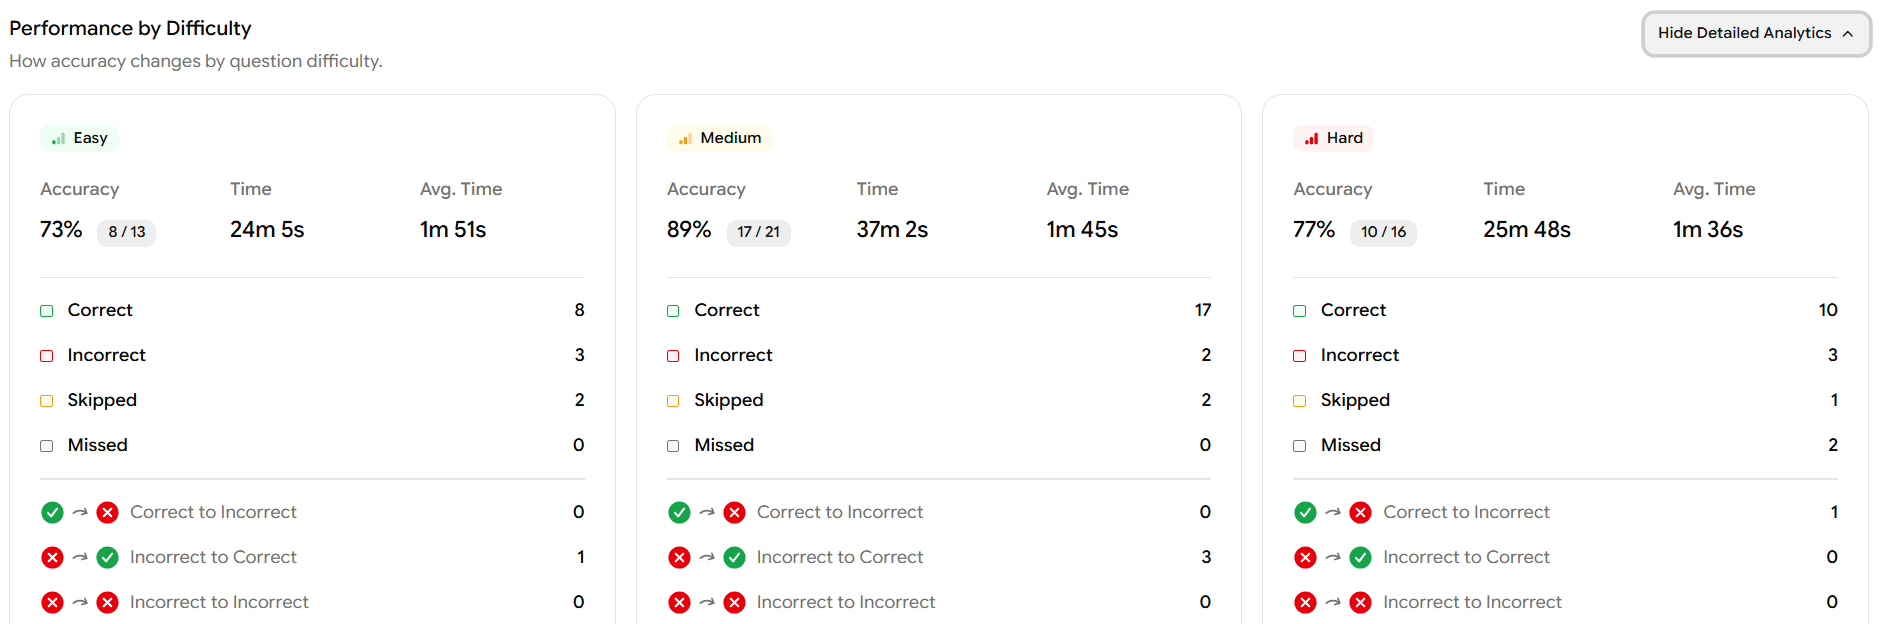
Performance by Difficulty: It shows how accuracy and time varied across Easy, Medium, and Hard questions within that section. Each difficulty tier displays Accuracy, total Time, and Average Time per question. Click Show Detailed Analytics to expand further.
Skill-Difficulty Heatmap: A table organized by Domain and Skill, showing accuracy across all difficulty levels (Easy, Medium, Hard) in a single view. Click on any Domain to expand it and see individual Skills and Subskills underneath. Each cell is color-coded:
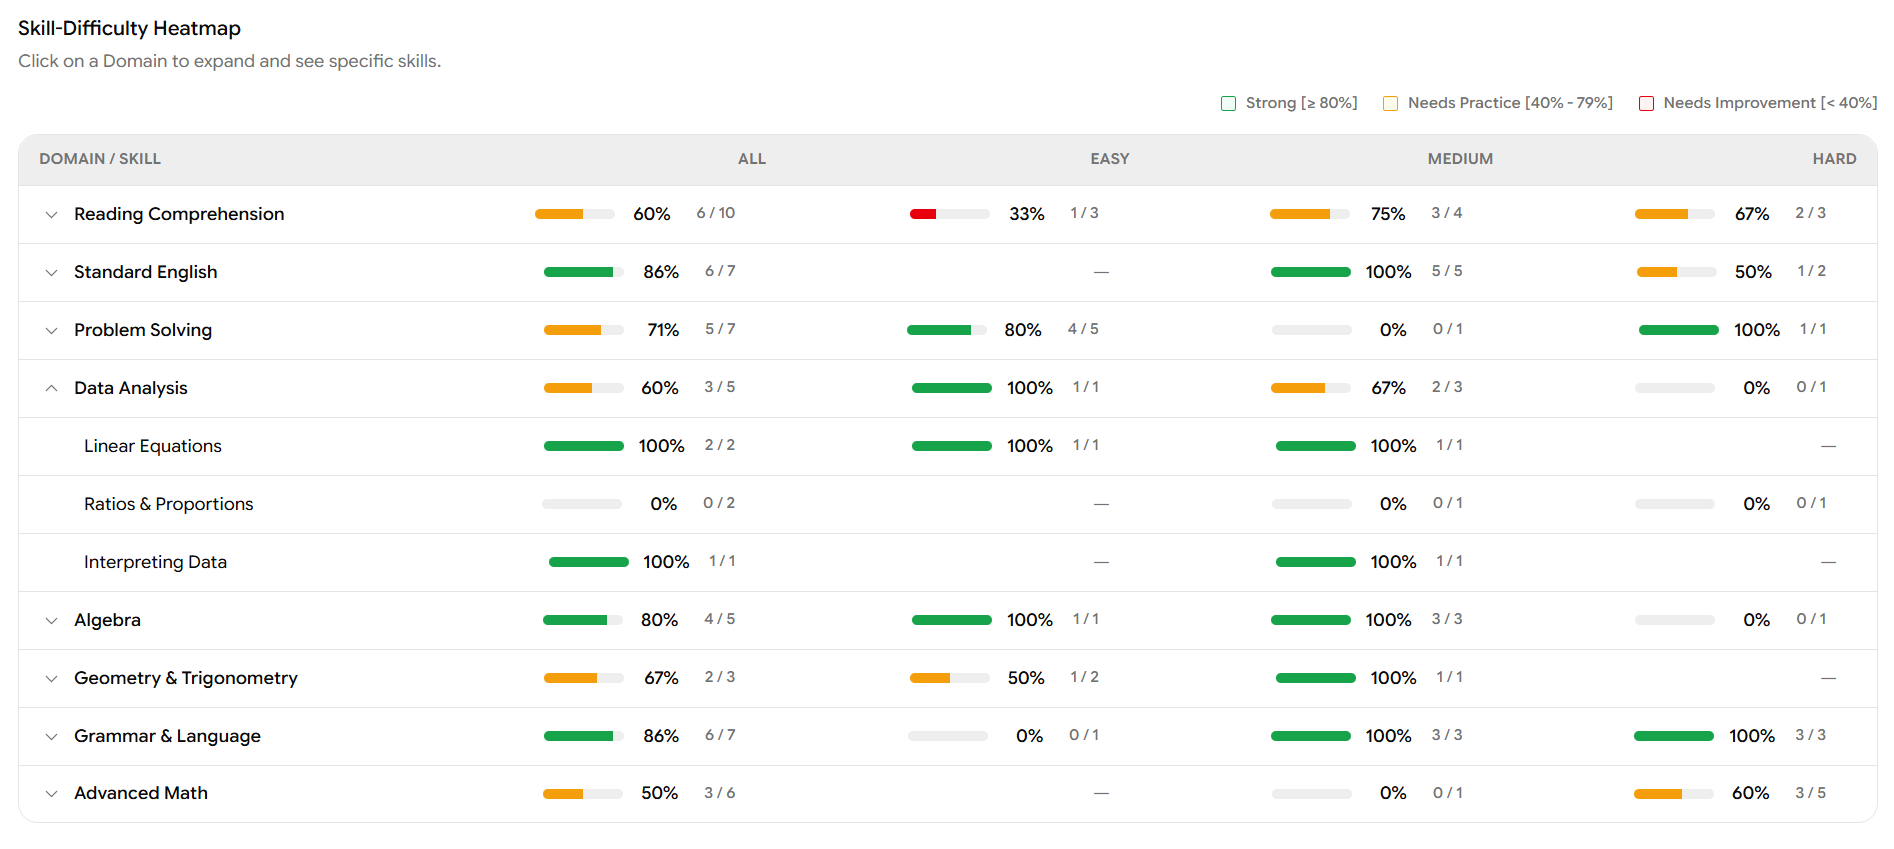
Color | Label | Accuracy range |
|---|---|---|
🟢 Green | Strong | ≥ 80% |
🟡 Yellow | Needs Practice | 40% – 79% |
🔴 Red | Needs Improvement | < 40% |
Performance by Time: A bar chart showing time spent per question across the section (e.g., q1 through q50), with each bar color-coded by outcome:
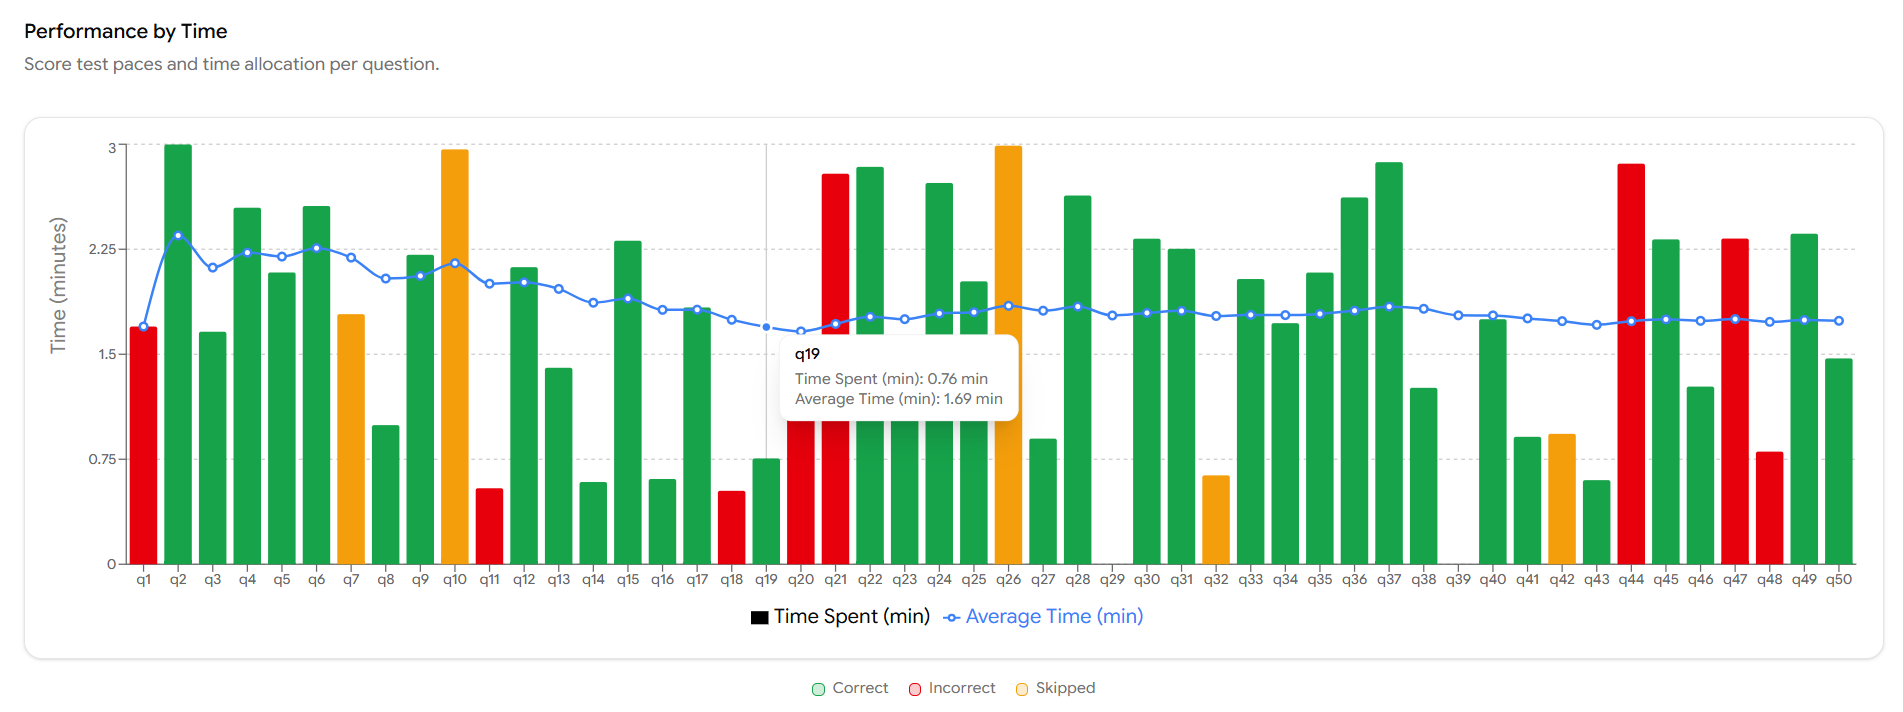
Color | What it means |
|---|---|
🟢 Green | Correct answer |
🔴 Red | Incorrect answer |
🟡 Yellow | Skipped question |
A blue dotted line runs across the chart showing the Time for that question & Average time across all questions in the section, so you can immediately spot questions where the student spent significantly more or less time than average.
Hover over any bar to see a tooltip with the exact details for that question. For example, hovering over q7 shows Time Spent: 1.79 min and Average Time: 2.19 min. This makes it easy to identify specific questions where pacing was off.
Step 7: Return to Practice Tests
Once you've finished reviewing the sample report, close it using the X (close) button in the top-left corner of the report screen.

This will take you back to the Practice Tests list, where you can preview additional Practice Tests before assigning them to students.
Tip: You don't have to leave the report to assign it. The Assign Practice Test button in the top-right corner lets you assign the Practice Test to students directly from the preview.
Summary of the Full Preview Flow
Select the Program → Practice Tests → Click Preview → Confirm → System Check → Start Preview → Answer Questions → End Test → Review Sample Report → Back to Practice Tests